In this tutorial we are going to see different keywords we use in TestNG to structured the Test and its defined methods.
1> Priority Keyword: If you want the methods to be executed in a different order, use the parameter "priority".
Parameters are keywords that modify the annotation's function.
Parameters require you to assign a value to them. You do.this by placing a "=" next to them, and then followed by the value.
TestNG will execute the @Test annotation with the lowest priority value up to the largest. There is no need for your priority values to be consecutive.
You can run a single or multiple test cases in your TestNG code.
If test priority is not defined while, running multiple test cases, TestNG assigns all @Test a priority as zero(0).
Syntax:

Example:


😀 TIME TO IMPLEMENT the Same IN YOUR ECLIPSE NOW 😀
2> Parallel Testing in TestNG: TestNG parallel execution of tests, classes and suites with examples. Learn how to run testng tests and suites in parallel or single test in multiple threads.
Parallelism or multi-threading in software terms is defined as the ability of the software, operating system, or program to execute multiple parts or sub-components of another program simultaneously.
In testng.xml, if we set 'parallel' attribute on the tag to 'tests', testNG will run all the ‘@Test’ methods in tag in the same thread, but each tag will be in a separate thread.
If we want to run methods/classes in separate threads, we need to set 'parallel' attribute on the tag to 'methods' / 'classes'
The attribute thread-count allows you to specify how many threads should be allocated for this execution.
Syntax:

Example: Below command will run all methods parallel with maximum 5 session at once for below mentioned class.
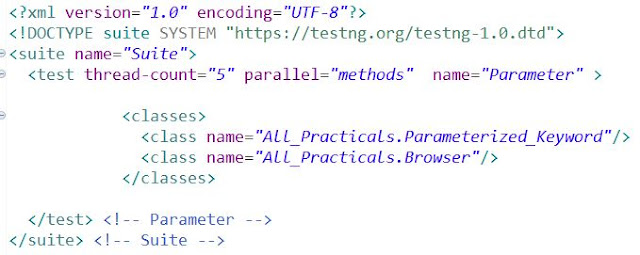
You can defined the Methods, Classes and Tests as per your requirement in Parallel Mode:

😀 TIME TO IMPLEMENT the Same IN YOUR ECLIPSE NOW 😀
3> Groups Keyword: Grouping test methods is one of the most important features of TestNG.
In TestNG users can group multiple test methods into a named group. You can also execute a particular set of test methods belonging to a group or multiple groups.
You can achieve the same on two ways:
1> Groups on Methods Level: You can define the grouping at Method level, so you can see the grouped result.

2> Groups on Class Level: You can define the grouping at Class level, so in case you did not define the group at method level it will take by default from class.

Once you grouped them together and run the class, it will display the output in Index.HTML report file as below with grouping.

😀 TIME TO IMPLEMENT the Same IN YOUR ECLIPSE NOW 😀4> invocationCount - threadPoolSize
invocationCount determined how many times TestNG should run this test method.
threadPoolSize attribute tells TestNG to create a thread pool to run the test method via multiple threads. With thread pool, it will greatly decrease the running time of the test method.
Example: To run below method with 10 times and thread pool 2 means create two pools every time. Hence system will load both instance 5 times and record the time.

We can increase and reduce the threadPoolSize to see the variation in the record time.

😀 TIME TO IMPLEMENT the Same IN YOUR ECLIPSE NOW 😀
~~~~ Other TestNG Related Tutorial Links~~~~
TestNG Tutorial - Introduction Part
TestNG Tutorial Advanced Topics - Part 1 (Configuration of TestNG)
TestNG Tutorial Advanced Topics - Part 2 (TestNG.XML File)
TestNG Tutorial Advanced Topics - Part 3 (Priority, Groups, Parallel Mode, invocationCount, ThreadPool)
TestNG Tutorial Advanced Topics - Part 4 (Parameterization, Data Provider)
TestNG Tutorial Advanced Topics - Part 5 (Exclude,Listeners,DependsOnMethod)
1> Priority Keyword: If you want the methods to be executed in a different order, use the parameter "priority".
Parameters are keywords that modify the annotation's function.
Parameters require you to assign a value to them. You do.this by placing a "=" next to them, and then followed by the value.
TestNG will execute the @Test annotation with the lowest priority value up to the largest. There is no need for your priority values to be consecutive.
You can run a single or multiple test cases in your TestNG code.
If test priority is not defined while, running multiple test cases, TestNG assigns all @Test a priority as zero(0).
Syntax:

Example:
- Normal report without setting up the priorities where Method 1 run first and then Method 2.

- Now we assign the priority to change the execution mode of the class methods.

- Execution order get changed when we setup the priority for them to run in specific order.

😀 TIME TO IMPLEMENT the Same IN YOUR ECLIPSE NOW 😀
2> Parallel Testing in TestNG: TestNG parallel execution of tests, classes and suites with examples. Learn how to run testng tests and suites in parallel or single test in multiple threads.
Parallelism or multi-threading in software terms is defined as the ability of the software, operating system, or program to execute multiple parts or sub-components of another program simultaneously.
In testng.xml, if we set 'parallel' attribute on the tag to 'tests', testNG will run all the ‘@Test’ methods in tag in the same thread, but each tag will be in a separate thread.
If we want to run methods/classes in separate threads, we need to set 'parallel' attribute on the tag to 'methods' / 'classes'
The attribute thread-count allows you to specify how many threads should be allocated for this execution.
Syntax:


You can defined the Methods, Classes and Tests as per your requirement in Parallel Mode:

😀 TIME TO IMPLEMENT the Same IN YOUR ECLIPSE NOW 😀
3> Groups Keyword: Grouping test methods is one of the most important features of TestNG.
In TestNG users can group multiple test methods into a named group. You can also execute a particular set of test methods belonging to a group or multiple groups.
You can achieve the same on two ways:
1> Groups on Methods Level: You can define the grouping at Method level, so you can see the grouped result.

2> Groups on Class Level: You can define the grouping at Class level, so in case you did not define the group at method level it will take by default from class.

Once you grouped them together and run the class, it will display the output in Index.HTML report file as below with grouping.

😀 TIME TO IMPLEMENT the Same IN YOUR ECLIPSE NOW 😀4> invocationCount - threadPoolSize
invocationCount determined how many times TestNG should run this test method.
threadPoolSize attribute tells TestNG to create a thread pool to run the test method via multiple threads. With thread pool, it will greatly decrease the running time of the test method.
Example: To run below method with 10 times and thread pool 2 means create two pools every time. Hence system will load both instance 5 times and record the time.

We can increase and reduce the threadPoolSize to see the variation in the record time.

😀 TIME TO IMPLEMENT the Same IN YOUR ECLIPSE NOW 😀
~~~~ Other TestNG Related Tutorial Links~~~~
TestNG Tutorial - Introduction Part
TestNG Tutorial Advanced Topics - Part 1 (Configuration of TestNG)
TestNG Tutorial Advanced Topics - Part 2 (TestNG.XML File)
TestNG Tutorial Advanced Topics - Part 3 (Priority, Groups, Parallel Mode, invocationCount, ThreadPool)
TestNG Tutorial Advanced Topics - Part 4 (Parameterization, Data Provider)
TestNG Tutorial Advanced Topics - Part 5 (Exclude,Listeners,DependsOnMethod)


